dinsdag 2 oktober 2012
English Tutorial: DIY Tarn (T-Shirt Yarn)
Nog geen twee maanden geleden begon ik dit blog en het is zo ontzettend leuk om te merken dat enkele mensen al meelezen! Zo kwam ik er gisteren zelfs achter dat er internationale interesse is voor het materiaal (mijn zelfgemaakte draad) waar ik de mollige mand van heb gehaakt ;-) . Vandaar dat ik deze tutorial hier nu in een Engelstalige versie plaats.
So, now in English. In this tutorial I will tell you how I've made the yarn that I've used for the Chunky Basket. The original idea is to make yarn from an old T-shirt, that's why it is called 'tarn' (T-shirt yarn). There are a lot of tutorials for that online. But I didn't have an old T-shirt (I cleaned up my closet) and I wanted a lot of yarn and decided to use a sheet. I guess you can use a lot of things, as long as the material is stretchy, because the yarn has to roll a bit once it is cut in strips. The thing is that you want a continuous yarn, and I didn't know how to achieve this. It is easy when you're using a T-shirt, because a T-shirt is a tube, so you can cut in a spiral. But you can't do that when you're greedy like me, and you want a bunch of tarn and you want to use a sheet. So, here is what I did!
I used a fitted sheet, so I had to cut off the elastic and I had to cut the corners loose.


This resulted in the sheet as shown in the picture above. As indicated by the white lines and the white arrow the corners are missing. You can cut the sheet straight, but I wanted to use all the fabric, so I continued with the sheet looking like this.
So now we're going to start with the yarn making! When you're using a normal, straight sheet, you can start with the tutorial from this point.
Step 1: Fold the sheet in half


Step 3: Fold the sheet open. Your sheet should look like the image below. The white lines are the lines that you've cut, and they don't go all the way to the border! They're still attached to each other.
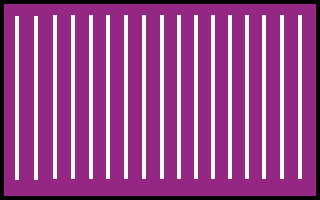
Step 4: While the sheet is still unfolded, you cut as indicated by the yellow dotted lines in the image below. This way you cut the strips all the way through the border. You cut every other strip on one side. On the other side of the sheet, you cut the other strips.

Step 5: This way you've made a continuous yarn. Pull the yarn a bit, so the elastic fabric will roll. The last step is to roll up the yarn to a ball...


So, now in English. In this tutorial I will tell you how I've made the yarn that I've used for the Chunky Basket. The original idea is to make yarn from an old T-shirt, that's why it is called 'tarn' (T-shirt yarn). There are a lot of tutorials for that online. But I didn't have an old T-shirt (I cleaned up my closet) and I wanted a lot of yarn and decided to use a sheet. I guess you can use a lot of things, as long as the material is stretchy, because the yarn has to roll a bit once it is cut in strips. The thing is that you want a continuous yarn, and I didn't know how to achieve this. It is easy when you're using a T-shirt, because a T-shirt is a tube, so you can cut in a spiral. But you can't do that when you're greedy like me, and you want a bunch of tarn and you want to use a sheet. So, here is what I did!
I used a fitted sheet, so I had to cut off the elastic and I had to cut the corners loose.

So now we're going to start with the yarn making! When you're using a normal, straight sheet, you can start with the tutorial from this point.
Step 1: Fold the sheet in half
Step 2: Cut the sheet as indicated by the white lines shown in the image below. You cut right over the folding line, but you don't cut all the way to the border. You stop a few centimeters from the border.
The elastic fabric will roll, that can make it difficult to cut. It's easy when you can spread the sheet over a large table or when you can ask someone to help you hold the sheet right.
Step 4: While the sheet is still unfolded, you cut as indicated by the yellow dotted lines in the image below. This way you cut the strips all the way through the border. You cut every other strip on one side. On the other side of the sheet, you cut the other strips.
Step 5: This way you've made a continuous yarn. Pull the yarn a bit, so the elastic fabric will roll. The last step is to roll up the yarn to a ball...

and start crocheting! Have fun!
Abonneren op:
Reacties posten (Atom)
Over mij

- Stefanie
- Welkom op mijn blog! Hier schrijf ik over mijn favo dingen; breien, haken en andere kneuterige knutseldingen.
Mijn favoriete blogs
-
Kuromi Beanie (knit) - By Janet Carrillo "damn it Janet, let's crochet!" * Simple but yet very stylish; for boys and girls of all ages. You can comfortably wear it during any s...
 1 week geleden
 -
Mini ecosysteempje - Je ziet ze nu overal om je heen te koop, maar hoe leuk is het om er één zelf te maken! Je eigen ecosysteem. Lekker veel groen in huis en je hoeft er niet n...
 6 jaar geleden
 -
Bronte Top van SterrenStof - Het eerste t-shirt voor mijn lente/ zomer garderobe is klaar! Ik naaide vorige week deze Bronte Top, van blauwe Sterrenstof. De stof is een tricot van Gü...
 7 jaar geleden
 -
Papegaai Paco - Mag ik aan jullie voorstellen... Papegaai Paco! Wil je deze kleurrijke papegaai ook haken, het patroon is vanaf nu te bestellen via de website. KLIK H...
 8 jaar geleden
 -
komkommergezichtjes in een pot - Als wij nasi, stamppot boerenkool of Oosterse stamppot eten gebruiken we daar graag als eetbare garnering wat "zuurs" bij. Ik maak daarvoor regelmatig e...
 9 jaar geleden
 -
Merry Christmas - [image: photo Handtekening cooltext147368900226892_zpseagbzkx3.jpg]
 10 jaar geleden
 -
Kruikzakken - Yes de warme temperaturen komen er weer aan en ik kan niet wachten om m'n jurkjes en rokjes uit de kast te trekken en er zonder 5 laags maillot mee naar b...
 10 jaar geleden
 -
Mooi weer. Lovely weather - Hello! Wat een heerlijk weer! Ik kan niet anders zeggen. Dit is toch echt genieten he. Heb na moederdag nog 2 sjaals gehaakt, niet dat ik ze nodig had...
 11 jaar geleden
 -
-
Freubelweb
Thank you for a fantastic idea :)
BeantwoordenVerwijderen